
RULE BOOK
You can view the Rule Book below as a web page or download it as a PDF (coming soon).
Download as PDF (coming soon)
How to Play in Under 5 min
If you have a short attention span and want to get into a game as quickly as possible, this video is for you. There is no voiceover, so reading and paying close attention is required, but you'll get through the game setup, core concepts, and an example round in under 5 minutes.
General Rules Navigation
BACKGROUND | OBJECTIVE | GAME COMPONENTS | GAME SURFACE LAYOUT | ESSENCE AND MIGHT | GAME SETUP | ROUND PHASES | END OF THE GAME PHASE | GAME DECK CARDS | ABILITY TYPES | CARD ABILITY KEYWORDS | TOKENS | DEPLOY PHASE | REVEAL PHASE | DEPLOY / COLLAPSE | BATTLEFIELDS | MOVING CARDS | DESTROYING CARDS | RETURNING CARDS | DISCARDING CARDS | BANISHING CARDS | COMMAND PHASE | FINAL TIPS FOR PLAYING | COMPANION APP | ALTERNATE PLAY
BACKGROUND
The Creators have vanished! In their absence, a power vacuum has formed in the high heavens - the realm known as Empyrean. Armies across space and time have gathered on battlefields across Empyrean to stake their claim and rule over all of existence.
You and your opponent will assume command of an historical or fictional army from the past, present, or future and strategically deploy your forces to overwhelm the other.
OBJECTIVE
Accumulate more might than your opponent on 2 of the 3 battlefields after 10 rounds. You will accomplish this by spending available essence each round to strategically deploy your cards on these battlefields and maximize their ability to gain Might.
GAME COMPONENTS
Battle for Empyrean is played by 2 players on a tabletop or other large flat surface. See the Alternate Play section for play modes involving 3 or 4 people. The game includes the following:
Premade Game Decks of 24 cards each that drive the gameplay. The number of decks depends on the version purchased. Each deck follows the same construction pattern, but plays uniquely.
Duplicate Battlefield Decks that randomize each game, separated by card back color (yellow, red; blue with expansion). The number of Battlefield cards depends on the versioned purchase.
Various helper and tracker cards that aid and track your gameplay with the help of various colored cubes.
Circle tokens with numbers & symbols that mark cards during gameplay. The number of tokens depends on version purchased.
1 First Player token shaped like a Pirate coin that tracks turn order.
GAME SURFACE LAYOUT

While there is no single way you must arrange your cards on your flat surface, the above diagram is the recommended approach for two players sitting across from each other. The colors in the diagram denote the following:
[Blue] 3 battlefield cards (the number itself is not material).
[Green] battlefield zones where you can deploy cards. Deploy cards into the lowest numbered zone possible and you cannot exceed 6 deployed cards per battlefield.
[Red] game deck space where you will put your deck face down to draw cards.
[Purple] piles of cards that may accumulate during the game for various reasons like discard, destroy, and banish.
[Yellow] round & essence tracker to keep track of each value.
[Orange] circle tokens to mark your cards (see Tokens).
ESSENCE AND MIGHT
Essence and might are the two main currencies in the game. You spend essence to deploy cards. Cards accumulate might to win a battlefield and ultimately the game.
Essence


The symbol above is used to represent essence on cards.
Each player starts with 2 base essence in round 1.
Your base essence increases by 1 each round. For example, you'll have 3 base essence to spend in round 2.
Essence can be added or subtracted from this base amount each round by card abilities or battlefield effects. These increases or decreases only last for a single round.
All cards have an essence cost, which is the top left number on the card next to the eseence symbol above.
Unspent essence does not roll over between rounds.
Might


The symbol above is used to represent might on cards.
All game deck cards have a reveal might, which is the middle left number on the card next to the might symbol above. When a card is revealed on a battlefield, apply this might to the card using might tokens. This reveal instruction also resides above the card's ability box (see Game Deck Cards for more information).
You may apply or remove additional might tokens to a card because of a card's own ability, other cards' abilities, or battlefield effects.
A card can never go below 0 (zero) might. A card with 0 might has no numbered might tokens on it.
A card's ability may indicate that it has a maximum might. If stated, this only affects might gained by the card's ability and a card may exceed that might due to battlefield effects.
GAME SETUP
To play the game, perform the following setup steps using the helper card to guide you. Most steps are repeated for each player:
Shuffle the yellow battlefield card deck and place 3 cards face-up in a vertical arrangement on the table for player 1 as shown in the example image above. Find the same battlefield cards in the red battlefield deck and mimic the arrangement for player 2, but on the opposite side of the table.
Choose a game deck, shuffle it, place it face-down on the table to the left of the battlefield cards, and draw 4 cards. The other player should do the same thing on their side of the table.
Place circle tokens within easy reach of each player.
Give each player an Essence/Round tracker. Place the purple cube on space #1 (to indicate round 1) and the orange cube on space #2 (to indicate you have 2 essence to spend this round).
Determine randomly who gets the first player token (you can use it for a coin flip if you wish) and begin round 1.
Watch the video below to see a full explanation of the game setup, round phases, and game end.
ROUND PHASES
Each 2-player game consists of 10 Rounds. Each Round has 6 phases and each phase is represented with an icon to help you identify when battlefield effects and card abilities trigger during the game. The player possessing the First Player Token goes first in phases 3-5:


Phase 1: Begin (do not perform on round 1) - Increase the round cube by 1 and set the essence cube to 1 more than the round cube number, regardless of what it was last round. Add or subtract any essence gained or lost last turn. Do this for both players simultaneously.


Phase 2: Draft - Draw 2 cards and keep 1 of them, placing the other on the bottom of the game deck. There is no maximum hand size. Do this for both players simultaneously. Since each deck has 24 cards, you start the game with 4 cards in your hand, and a game has 10 rounds, this means you will see every card in your deck once - unless a card causes you to shuffle your game deck. Deciding between acquiring a specific card in your deck and insuring that you see every card is one of many strategic decisions you may need to make during the game.


Phase 3: Command - Activate the command phase abilities of your revealed cards on any battlefield based on the rules of that card. Repeat for the other player in first player token order. If no command phase abilities are available on the battlefield for either player, skip this phase. Only some decks have cards that can utilize the command phase.


Phase 4: Deploy - Spend essence to deploy one or more cards face-down on open battlefield zone(s), noting the order in which cards were deployed (you can use might tokens to mark the order if it helps). Repeat for the other player in first player token order.
You may decide to "pass" your deploy phase if you don't have enough essence to deploy any cards in your hand or you simply don't want to deploy available cards at this time in the game for strategic reasons.
If you come across a battlefield with a deploy effect, follow the rules of that effect during the deploy phase.

Phase 5: Reveal - Reveal cards face-up one at a time in the order they were deployed. A card and its ability is not active on the Battlefield until it is revealed. With each reveal, do the following in order, then repeat the below reveal steps for the other player.:
Apply might tokens equal to the card's reveal might.
Resolve the card's ability, if applicable.
Resolve any ally card abilities that may trigger based on this card's reveal.
Resolve any battlefield effects that may trigger based on this card's deploy or reveal.


Phase 6: End - Resolve any card and/or battlefield "end phase" effects. Pass the first player token to the other player. After round 10, move to the "end of the game" phase.
Watch the video below to see the Round phases in action with an example Round.
END OF THE GAME PHASE
After round 10 is complete, resolve any "end of the game" effects (if any) for each player. After that is complete, you will:
Tally the might for each player on each battlefield. If Player 1 has more might than Player 2 on a battlefield, then Player 1 wins that battlefield. If a player wins 2 of the 3 Battlefields, that player wins the game!
If there is a tie on any battlefield that prevents a player from winning 2 battlefields, then total each player's might across all 3 battlefields. The highest total might wins!
GAME DECK CARDS
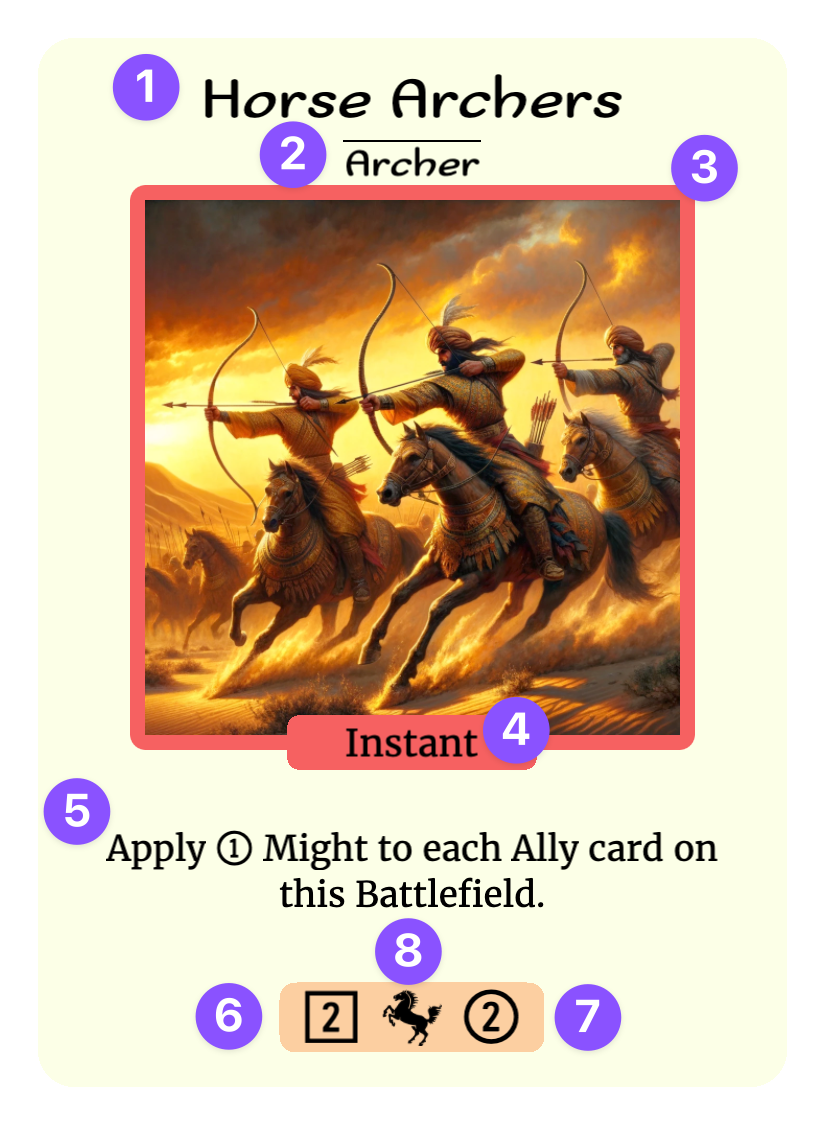
Following the purple numbers on the example Card above:
1 = Card name
2 = Card type - abilities may affect types of cards
3 = Card image + Ability type outline color
4 = Ability type - correlates to color; see next page
5 = Card ability - note the Capitalized keywords in the text
6 = Essence cost (square)
7 = Base might (circle)
8 = Deck symbol - a fun identifier for the deck
ABILITY TYPES
There are 3 ability types:
Instant (red image outline) - these abilities resolve one time as soon as you reveal the card and do not resolve again unless a card says otherwise.
Conditional (yellow image outline) - these abilities may resolve when you reveal the card and may continue to resolve throughout the game if their condition is triggered.
Passive (blue image outline) - these abilities are always active, but they resolve based on the instructions on the card.
CARD ABILITY KEYWORDS
Card abilities are carefully worded to instruct what happens, when, where, how and to whom.
Some card abilities are deck-specific and use a specialized font to name those abilities. On lower cost cards, this ability will typically be explained in parentheses on the card to indicate the meaning of the named ability. On higher cost cards, the explanation is often omitted in favor of text that describes an enhancement to the ability, typically involving a condition. If the named ability contains a might indicator number, that number represents how much might should be applied when that ability resolves.
Also pay attention to the presence of capitalized keywords on cards. These are listed below, but note they can be articulated on cards using multiple word forms (Deploy/Deployment):
Deploy: Put a card face-down on a battlefield zone by spending its essence cost during the deploy phase, or put it face-down during the reveal phase if instructed by a card ability.
Reveal: Turn a face-down card face-up.
Revealed: A card is considered revealed if it is face-up.
Resolve: Implement the effect of an ability to its completion when a card is revealed or its ability triggers.
Round: Refers to a current or future turn in the game.
Ally*: Other revealed cards you deployed from your game deck.
Opponent*: Any revealed cards your opponent deployed from their deck. (*if neither Ally nor Opponent are listed, both apply)
Battlefield: One of 3 play areas designated by a battlefield card.
Here: A short way to say "on this Battlefield."
Zone: Refers to any of the 6 card spaces on a battlefield.
Open Zone: Refers to any unoccupied zone.
Add/Subtract: Increase or decrease the amount of essence available to a player, typically on the next round.
Apply/Remove: Take the appropriate circle token (numbered or symbol) and put it on or remove it from the appropriate card. See "Circle Tokens" on the next page for more info on tokens.
Move: Take a revealed card on a battlefield and put it on an open zone on another battlefield.
Discard: Take a card from your hand and put it face-down in the discard pile. You may look at cards in your discard pile.
Destroy: Remove a revealed card from the battlefield and put it face-up in the destroy pile.
Banish: Remove a card from your hand or the battlefield and put it face-down in the banish pile. This card is effectively removed from the game unless another card says otherwise.
Return: Take a revealed card from the battlefield or a designated pile and place it into your hand, removing all might from it.
TOKENS

Might Tokens
Apply to: Your revealed cards
Effect: Adds might to the card.
Duration: Permanent (except by battlefield effect)

Stop Token
Apply to: Opponent battlefield cards (unless otherwise stated)
Effect: Prevents the next instant ability revealed on this battlefield from resolving.
Duration: One-time prevention

Stun Token
Apply to: Opponent revealed cards
Effect: Prevents a conditional ability from triggering for the remainder of the game.
Duration: Permanent
Shield Token
Apply to: Ally or opponent revealed cards
Effect: Prevents a card from being destroyed for the remainder of the game.
Duration: Permanent

Anchor Token
Apply to: Opponent revealed cards
Effect: Prevents a card from returning or moving for the remainder of the game.
Duration: Permanent

Move Token
Apply to: Ally revealed cards
Effect: Allows a card to move during the command phase.
Duration: One-time use
DEPLOY PHASE
During the deploy phase, put cards face-down on open battlefield zones to strategically build your might. Deploying cards is optional; you may "pass" this phase. When you deploy cards:
You must have the essence to pay for the card. You may deploy more than one card per round if you can pay for them.
You must deploy cards in the lowest numbered open battlefield zone possible, which generally means deploying them left-to-right beside the battlefield card if you follow the recommended game surface layout.
You must mentally remember the order in which you deploy cards, as this dictates the order in which you reveal them. This is important because face-down cards are not yet active on the Battlefield and thus can't be targeted, have their abilities triggered, gain might, etc. So reveal order matters.
REVEAL PHASE
During the reveal phase, flip cards face-up one at a time based on the order you deployed them and do the following for each card before revealing the next card:
Apply numbered circle tokens on the card equal to its base might.
Resolve the card's ability, if applicable.
Resolve other revealed ally conditional/passive card abilities.
Resolve any battlefield effects that may have been triggered.
DEPLOY / COLLAPSE
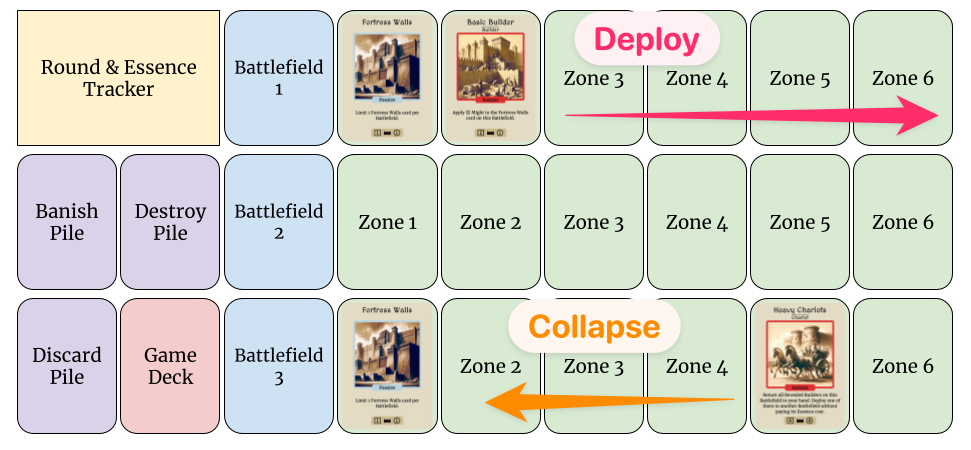
Deploying a card always involves putting a card on the next available open zone on a battlefield as shown on the game surface layout above using the pink arrow. This rule is followed regardless of whether the card was deployed during the deploy phase or because of an ability during the reveal phase. You will always populate a battlefield in increasing zone number order. In the image above, the next card deployed to Battlefield 1 will go in Zone 3.
Cards collapse when a revealed card vacates a zone number on the battlefield while there are one or more cards occupying higher zone numbers. For example, cards could vacate Zones 2, 3, and 4 as shown above on Battlefield 3. In this scenario, the card in Zone 5 slides left into Zone 2 as indicated by the orange arrow, maintaining all tokens as they slide. Cards can vacate a zone because they are destroyed, returned, moved, or some other future game action. A collapse does not count as a card move and does not trigger move abilities.
You can see more detailed collapse examples in Moving Cards and Destroying Cards.
BATTLEFIELDS
Each battlefield has two effects. Keep the following in mind:
Effects apply separately to each player unless a battlefield refers to the first player to achieve a milestone.
Effects are capable of changing the base game rules.
Effects can trigger each round, on specific rounds, or at the end of the game; pay close attention to this timing as you play.
The phrase "the first time you ..", refers to the whole game.
When an effect triggers from a card reveal, it is the last thing resolved as part of that card's reveal. See Reveal Phase.
MOVING CARDS
Some cards can move between battlefields if a card ability enables it. A move is always between battlefields and is different than a collapse, which happens within a battlefield.
When a card says move a card or specific category of cards to another battlefield, immediately choose a card and move it and its tokens to the first open zone on another battlefield. This is not optional. If there are no open zones, ignore this ability. If multiple cards are required to move, move them one at a time and you may move them to different battlefields.
When a card moves, it may cause a collapse of one or more cards on a battlefield. See Deploy / Collapse.
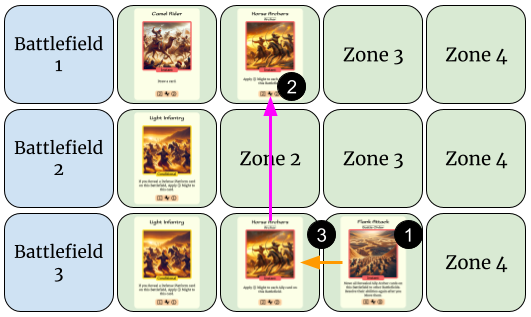
The example above shows:
Flank Attack is deployed and its ability triggers a move.
The player moves Horse Archers from battlefield 3 to 1.
Flank Attack collapses on battlefield 3 from zone 3 to 2.
You can watch how moving cards works with the Cavalry of the Parthian Empire in the video below (jump to the Example Play chapter):
DESTROYING CARDS
When an ally card says destroy one, some, or all ally cards on a battlefield, start with the card in the lowest number battlefield zone, immediately remove all might tokens, remove the card, resolving any conditional destroy abilities, put it face-up in your destroy pile, then collapse the battlefield. Repeat those steps for each other eligible card on the battlefield. Here's an example:

1. Eater of Souls is deployed, destroying all cards on battlefield 1.

2. Soul of the Living is destroyed first, put face-up in the destroy pile, 1 essence is added next round for its ability, 2 might is added to Eater of Souls for its ability, and all cards collapse.

3. Soul of the Powerful is destroyed next, put face-up in the destroy pile, 1 might is added to all cards for its ability, 2 might is added to Eater of Souls for its ability, and all cards collapse.
When an opponent card destroys one of your cards, the same actions above are performed for just that one single card.
You can watch how destroying cards works with the Spectres of the Necropolis Deck in the video below (jump to the Example Play chapter):
RETURNING CARDS
When a card says return a specific card or category of cards to your hand, immediately remove all might tokens from those cards and put the cards in your hand. This is not optional. If the specified card(s) are not on the battlefield, ignore this ability. You cannot return cards that have not been revealed yet.
When a card is returned to your hand, this may cause a collapse of cards on a battlefield. See Deploy / Collapse.
Cards returned to your hand can be normally deployed again on any future round on any battlefield.
You can watch how returning cards works with the Defenders of the Bastion deck in the video below (jump to the Example Play chapter):
DISCARDING CARDS
When a card says discard a certain number of cards, immediately choose that number of cards from your hand to put face-down in your discard pile. This is not optional unless an ability or effect says so. If you have fewer cards in your hand than directed to discard, discard all cards in your hand. If you have no cards in your hand, ignore this ability.
You may look at the contents of your discard pile at any time. Some cards have abilities that allow a player to deploy a card to a battlefield from the discard pile instead of your hand.
You can watch how discarding cards works with the Samurai of the Sengoku Deck in the video below (jump to the Example Play chapter):
BANISHING CARDS
When a card says banish a card, immediately put that card face-down in your banish pile. Banishing is different from destroying and discarding, therefore cards are put in a separate pile. Banished cards are not available to abilities that reference the discard or destroyed piles. Banished cards are typically inaccessible the rest of the game unless a card says otherwise.
COMMAND PHASE
The command phase is a new addition to the game with Deck Pack 01. It occurs between the draft and deploy phases, and follows the first player token order like the deploy and reveal phases.
During this phase, players are allowed to resolve card abilities that reference the command phase, as well as move cards with either permanent or one-time use move tokens.
All activity in the command phase resolves fully before moving to the deploy phase. This allows players to assess the full impact of the phase before deciding where to deploy cards.
Not all game decks utilize the command phase. When playing with a deck that doesn't, this phase can be ignored.
FINAL TIPS FOR PLAYING
The first few games will take a little longer as you get familiar with the flow of the game and the intricasies of your first game deck, so playing with the same deck multiple times before trying a new one helps to accelerate your acclimation to the game.
Read the deck strategy card before playing a deck for the first time. While this doesn't cover everything you can do with a game deck, it does give you core things to think about, which helps.
Remember to apply base might as soon as you reveal a card. This step can be easily forgotten as a player jumps straight into reading their card, and forgetting to apply this might can cause you to lose the game!!
COMPANION APP
Download the BforE mobile Companion App! It replaces your round and essence tracker and enables you to keep a running tally of your total battlefield might, which helps during gameplay. Scan the QR code below to download.


ALTERNATE PLAY
3-Player Mode
In a 3-player game, use all 3 battlefield deck colors, draw 4 Battlefield cards instead of 3, and play for 9 rounds instead of 10. A player must still win 2 battlefields to win the game. If 2 players win 2 battlefields each, the total might between just those 2 players wins the game. Here are a few other additional clarifications:
Stun and Stop Tokens can be applied to either opponent, but not both.
Any Battlefield that involves the first player to achieve something can still only be achieved once.
Any Battlefield that compares you to your opponent compares you to both opponents. Yes, that means you count the number of both opponent's revealed cards for The Eye of Power!!
Mash-up Mode
Combine cards from multiple decks, but remember to follow the deck template:
Five 1-cost cards
Four 2-cost cards
Four 3-cost cards
Three 4-cost cards
Three 5-cost cards
Two 6-cost cards
Two 7-cost cards
One 8-cost card
